python人脸识别
人脸识别的主要算法
其核心算法是 欧式距离算法使用该算法计算两张脸的面部特征差异,一般在0.6 以下都可以被认为是同一张脸
人脸识别的主要步骤
1 获得人脸图片 2 将人脸图片转为128D的矩阵(这个也就是人脸特征的一种数字化表现) 3 保存人脸128D的特征到文件中 4 获取其他人脸转为128D特征通过欧式距离算法与我们保存的特征对比,如果差距在0.6以下就说明两张脸差距比较小
准备工作
wget http://dlib.net/files/shape_predictor_5_face_landmarks.dat.bz2 wget http://dlib.net/files/dlib_face_recognition_resnet_model_v1.dat.bz2 下载完成后 通过 bzip2 -d 命令解压这两个压缩包
以下就按照上面的步骤一步一步去实现人脸识别
1 获取人脸
获取人脸的方式有两种途径 1 通过图片 2 通过摄像头采集
图片方式
通过图片获取人脸 demo(需要检查图片中是否包含了人脸)
```python import cv2 import dlib
picture = '/home/sunshine/faces/harden1.jpg' detector = dlib.get_frontal_face_detector()
def add_face_from_image(image): imdata = cv2.imread(image) rgb_image = cv2.cvtColor(imdata, cv2.COLOR_BGR2RGB) faces = detector(rgb_image, 1) if len(faces) == 0: print("没有检测到人脸") else: # 到此就获取到了人脸数据 pass ```
视频方式
通过视频方式获取人脸demo 这种方式需要把视频的图片截取下来保存到指定的路径
```python import cv2 import dlib from pathlib import Path video = cv2.VideoCapture(0) save_path = '/home/fantasy/faces'
def read_camera0(): """ 读取摄像头 """
while 1:
    ok, frame = video.read()
    if not ok:
        print("读取摄像头#0失败")
        return
    else:
        yield frame

video.release()
def putText(image, text, location=(100, 150), font=cv2.FONT_HERSHEY_COMPLEX, size=1.1, color=(0, 255, 255), font_weight=2): """ 往视频上加文字 param: image 视频/图片 param: text 文字内容 param: location 文字的位置 param: font 字体 param: size: 字体大小 param: color: 字体颜色 param: font_weight 字体粗细 """ cv2.putText(image, text, location, font, size, color, font_weight, lineType=cv2.LINE_AA)
def add_face_from_camera(): frames = cv_tools.read_camera0() count = 0 for frame in frames: image_rgb = cv2.cvtColor(frame, cv2.COLOR_BGR2RGB) title = 'Register' press = cv2.waitKey(2) data = detector(image_rgb) if len(data) == 0: putText(frame, "No face was detected!", color=(0, 0, 255)) if press == ord('q'): break if press == ord('a'): if len(data) == 0: putText(frame, "No face was detected!", color=(0, 0, 255)) else: count += 1 impath = Path(save_path).joinpath('%s.jpg' % count) print("保存照片 %s" % impath) cv2.imwrite(str(impath), frame) cv_tools.putText(frame, 'a:Add', location=(40, 300)) cv_tools.putText(frame, 'q:Quit', location=(40, 350)) cv_tools.putText(frame, 'save count:%s' % count, location=(40, 400), size=1.0) cv2.imshow(title, frame) cv2.destroyAllWindows() ```
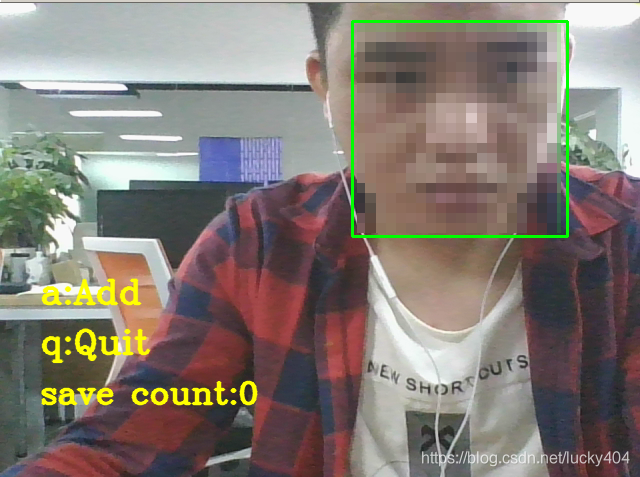
视频的方式需要注意几点 1 我使用的是笔记本电脑因此 通过 cv2.VideoCapture(0) 方法默认就是获取到笔记本默认的摄像头,如果你的台式机没有摄像头或者是外接摄像头可能就无法获取 2 视频的方式保存图片 需要将光标点击到视频,然后按 a 键, 退出就按 q 键 3 视频中如果没有检查到人脸就会出现提示 No face was detected! 此时是没法保存图片的
视频方式截图

到这一步就完成了 获取人脸照片,保存到指定的路径了
2-3 将获取到的人脸数据转为128D 数据,并保存到文件
这一步我们要做的就是,将我们上一步保存的人脸数据,通过使用dlib 提取人脸特征然后保存到文件里面 这样我们就拥有了 某张脸的数据了, 下次直接使用这个数据和新的数据比对就可以确定是否是同一个人
人脸转为128D特征数据demo
```python import os import cv2 import dlib from imutils import paths
face_image = '/home/sunshine/faces' predictor_path = '/home/fantasy/MachineLearning/cv/shape_predictor_5_face_landmarks.dat' face_model_path = '/home/fantasy/MachineLearning/cv/dlib_face_recognition_resnet_model_v1.dat'
def prepare(): """ """ if not os.path.exists('feature'): os.mkdir('feature') if os.path.exists('feature'): shutil.rmtree('feature') os.mkdir('feature')
def get_detector(): """ """ return dlib.get_frontal_face_detector()
def get_predictor(): """ """ return dlib.shape_predictor(predictor_path)
def get_face_model(): """ """ return dlib.face_recognition_model_v1(face_model_path)
def get_faces_image(): """ """ return paths.list_images(face_image)
def faces_to_128D(): """ """ prepare() faces = get_faces_image() detector = get_detector() predictor = get_predictor() face_model = get_face_model() count = 0 for image in faces: imdata = cv2.imread(image) image_rgb = cv_tools.bgr2rgb(imdata) has_face = detector(image_rgb, 1) if len(has_face) == 0: print("未检测到人脸 %s" % image) continue count += 1 shape = predictor(image_rgb, has_face[0]) face_desc = face_model.compute_face_descriptor(image_rgb, shape) feature_array = np.array([]) for _, desc in enumerate(face_desc): feature_array = np.append(feature_array, desc) filename = str(count) + '.csv' filename = os.path.join('feature', filename) print("保存 %s 特征文件 %s" % (image, filename)) face_feature_to_csv(filename, feature_array)
def face_feature_to_csv(filename, col): """ """ np.savetxt(filename, col, delimiter=',') ```

通过上面的步骤我们把之前通过图片或者视频方式获取到的人脸提取到了特征 保存在文件里面了
4 人脸对比
通过前面的方式我们已经拥有了一个可以识别某张脸的数据,现在就需要采集到其他的人脸图片转为128D再和我们保存的数据,使用欧式距离方式进行对比
人脸对比的demo 从摄像头或者图片从获取人脸对比已有的数据
```python import cv2 import dlib import glob import numpy as np
保存人脸特征的csv文件路径
csv_path = '/home/sunshine/feature' all_load_feature = []
1 先把保存的人脸特征读取到
def load_face_feature(): """ """ all_csv = glob.glob(csv_path + '/*.csv') for filename in all_csv: array = np.loadtxt(filename, delimiter=',') print("加载已有的面部特征文件 %s" % filename) all_load_feature.append(array)
2 再从摄像头或者 图片从获取一张人脸,转为128D数据和现有的对比
def read_face_from_image(image): """ 通过从图片中获取人脸 """ imdata = cv2.imread(image) face_compare(imdata) cv2.imshow("face recogition", imdata) key = cv2.waitKey(0) if key == ord('q'): cv2.destroyAllWindows()
def face_compare(face_image): """ """ rgb_image = cv2.cvtColor(face_image, cv2.COLOR_BGR2RGB) im_shape = rgb_image.shape im_height = im_shape[0] im_width = im_shape[1] faces = detector(rgb_image, 1) # 要检查图片中是否包含人脸 if len(faces) == 0: putText(face_image, "No face was detected!", color=(0, 0, 255)) else: # 将图片中的人脸转为128D数据 feature = face_feature(rgb_image, faces) csv_feature = random.choice(all_load_feature) # 使用欧式距离计算两张脸的差距 same = face_recogition(feature, csv_feature) if same: putText(face_image, "Yes!", location=(int(im_height/2), int(im_width/2))) else: putText(face_image, "No!", location=(int(im_height/2), int(im_width/2)), color=(0, 0, 255))
def face_feature(image, faces): """ """ model = get_face_model() predictor = get_predictor() array = np.array([]) shape = predictor(image, faces[0]) face_desc = model.compute_face_descriptor(image, shape) for _, desc in enumerate(face_desc): array = np.append(array, desc) return array
def face_recogition(face1, face2): """ """ # 计算两张脸的欧式距离 方法 1 # distance = 0 # for i in range(len(face1)): # distance += (face1[i] - face2[i])**2 # distance = np.sqrt(distance) # 计算两张脸的欧式距离 方法 2 # distance = np.sqrt(np.sum(np.square(face1 - face2))) # 计算两张脸的欧式距离 方法 3 distance = np.linalg.norm(face1- face2) print(distance) if(distance < 0.5): return True else: return False
def read_face_from_camera0(): """ 从摄像头获取人脸 """ video = read_camera0() for frame in video: face_compare(frame) cv2.imshow("face recogition", frame) key = cv2.waitKey(1) if key == ord('q'): break cv2.destroyAllWindows() ```
以下是我从图片中输入了一张人脸,并将这张人脸特征保存到1.csv

然后再分别给一张是同一个人,不同人的脸的输出结果


参考文献
- 面向人脸识别的加密认证技术研究与实现(贵州大学·吴俊青)
- 提供人脸识别服务的计费管理系统设计与实现(大连理工大学·宋一凡)
- 人脸识别布控系统的设计与实现(武汉邮电科学研究院·邓锋)
- 具有表情和语音识别功能的心理测评系统设计与实现(电子科技大学·罗楷文)
- 基于人脸聚类的图片管理系统的设计与实现(首都经济贸易大学·王子涛)
- 基于通用检测和跨层特征整合的人脸检测算法研究(哈尔滨工业大学·王琦)
- 基于人脸识别的身份认证系统的设计与开发(河北大学·刘坤)
- 电信运营商人脸识别系统的设计与实现(湖北工业大学·陈子健)
- 智慧社区人脸识别系统的设计与实现(华中科技大学·刘合鑫)
- 基于CNN的交互式巨幅人物合照展示系统设计与实现(华中师范大学·刘燕)
- 基于人脸识别的摄影协会综合管理系统设计与实现(哈尔滨工程大学·李世强)
- 基于嵌入式系统的人脸检测与识别应用研究(中国矿业大学·朱佳伟)
- 基于深度学习的人脸识别研究及其实现(南京理工大学·郑大刚)
- 人脸识别与RFID相结合的身份认证系统的设计与实现(苏州大学·钟海林)
- 电信运营商人脸识别系统的设计与实现(湖北工业大学·陈子健)
本文内容包括但不限于文字、数据、图表及超链接等)均来源于该信息及资料的相关主题。发布者:源码码头 ,原文地址:https://bishedaima.com/yuanma/36125.html


